Guitar Building, Audio Effects, and DIY Resources
←Back to Redwood Audio DSP home
JUCE 4.x for VST Plugin Development (old JUCE 3.x Tutorial)
Need Help with this Tutorial? (Contact Us)
Was this useful? (Consider a Contribution)
Download Tutorial Source Code including built VST or the Source using AudioParameterX Classes
Alright, after the first few steps we have a project - how do we work with it?... What we will call the JUCE work-flow consists of three types of operations.
1. Adding source code or other project dependencies (Projucer)
2. Modifying the graphical user interface (Projucer)
3. Tying the GUI and Source together through the wrapper Plug-In (Visual Studio/XCode)
These steps can be done in almost any order and repeated as needed to work through the whole development life-cycle of your plug-in. General pointers for each step will be provided as well as some examples specific to our stereo width controller. Note that there are many ways of doing these things and some programmers may prefer a different style. We hope you find our style easy to read and understand - feel free to optimize as needed.
1. Adding Source Code/Libraries, and other Project Settings
As discussed earlier, anything you would normally want to do to your project settings in your IDE should be handled through the Projucer tool. Realistically, if you never want to manage the project on multiple platforms and are not concerned with keeping the JUCE libraries up to day - you can leave the Projucer behind for build management. It may even become necessary if you need to maintain more complex project settings. However, if you can retain control through the Projucer, there is no reason not to and a few advantages to boot. Here are all the basic operations that developers will most definitely face.
Adding source files:
For this we will need some source files. Create (or download) a StereoWidthCtrl.h/.cpp file in your source folder. For illustrative purposes, we will add this to its own folder (Source\StereoWidthCtrl) and go through the adding of include directories as well.
StereoWidthCtrl.h | StereoWidthCtrl.cpp |
/*Volume-Normalized Stereo Width Control, contributed by
Michael Gruhn to the class
StereoWidthCtrl //Parameters void SetWidth(float
width); //Use void ClockProcess(float* LeftSample, float* RightSample); |
#include "StereoWidthCtrl.h"
m_width=width;
}
float m =
sumGain*(*LeftSample+*RightSample);
(*RightSample-*LeftSample);
*LeftSample=m-s; }
void StereoWidthCtrl::Process(float* LeftSamples, float*
RightSamples, int NumSamp)
float m, s; m = sumGain*(LeftSamples[i] +
RightSamples[i]); } |
Make sure Visual Studio 2015/XCode is closed before modifying the project (not strictly necessary to close, but it will eventually force a project reload anyway). Then open the Projucer.exe and select your plug-in project (this will be in the "recent files" list and can be selected) File→Recent Files and select the StereoWidthCtrl project. otherwise, use File→Open and browse to your project folder, select the *.jucer file. It should also automatically open your most recent project on launch.
You will see your project settings/code on the right. The left shows your source code or config trees - Select the "Files" Tab to show the soruce tree. These are your source files as seen in Visual Studio/XCode. You can use this tree control to add your source files.
Make a folder: Right click the "Source" folder→Add new group→type the name→hit <Enter>.
Add exisiting files: Right click the new folder->select "add existing files..." select our StereoWidthCtrl.h/.cpp files
Upon Saving the Projucer project, the files and directory structure we have chosen will be added to our Visual Studio/XCode project.
Additional Include Directories:
Since we created a new source directory (or if you are including files from elsewhere on your computer) we need to add the source path to your "additional include directories". To do that, go back to the "Config" Tab and select one of the build configurations in the tree under "Visual Studio 2015".
Starting with "Debug", find "Header Search Paths" and add your folders separated by ";" for multiple listings. In our example:
Header Search Paths ..\..\Source\StereoWidthCtrl;
Repeat for the "Release" configuration.
Save the Project.
When the Projucer project is saved, the Visual Studio project and solution files will be updated. Your solution explorer source will include your new files, and the any "Header Search Paths" will be added to the project.
Note: If you ever have include problems, you can debug your include folder settings from the IDE (In Visual Studio 2015, under Project Properties→Configuration Properites→C/C++→General→Additional Include Directories). Make adjustments as needed until it builds. Just make sure to then return to the Projucer, add each custom line back to the "Header Search Paths", save and relaunch Visual Studio for a final test build.
Adding Libraries:
While not used for this tutorial, it is very common to have to add particular library folders or libraries to the project. For that the Projucer provides a setting called "extra library search paths" This is equivalent to adding listings in Visual Studio Project Properties→Configuration Properites→VC++ Directories→Library Directories or modifying the environmental variable "LIB". The settings are separate for release and debug build configurations.
Other useful Project Settings:
The other settings in the Projucer worth noting here are the Preprocessor Definitions and the build commands - though you may want to explore the other settings on your own.
The Preprocessor Definitions, are just as you might expect, and are provided for each configuration (Debug and Release) - but also for global settings you can apply them directly to the "Visual Studio 2015" settings section under "Extra Preprocessor Definitions".
The build commands include "Pre-Build Commands", and "Post-Build Commands" for each configuration type. These are also used as expected (command line operations added to the build process), but the post-build step is particularly dear to our heart when dealing with building VST plug-ins in Windows. As a recommended step in the tutorial, add a post-build command to your release mode configuration which copies the DLL to your systems VST folder...
**note: This next step is done automatically by JUCE in OSX/Xcode! See deployment information on the OSX Setup tab.
If you have not already as a VST developer, give your VST folder an environment variable on your PC. For example, VSTPluginFolder = C:\VST which is where you have set all of your host applications look for VST plug-ins.
Then under the "Configuration Release:"
Post-Build Command copy /Y "$(TargetPath)" "$(VSTPluginFolder)"
You can also just hard-code the path to your VST Plugin-Folder. Either way, this is a useful step as now each time you build, the newly created VST is copied to your VST Plug-in Folder and thus instantly available in your host of choice.
Some hosts, such as AudioMulch, might need a refresh, others may need to be relaunched to scan the VST Folder for changes. Typically, you can deploy a new plugin by making sure there are no active instances. e.g. remove the plugin from your track, build and add it back.
At this point in the tutorial, we have done all project settings we are going to do through the Projucer. Remember, if you go back to update project settings later - close the IDE and return to the Projucer to make the needed changes.
2. GUI Editing with Projucer
This is the fun part! Adding a graphical interface to our plug-in. User interface changes are now made through the Projucer application by clicking on the *.cpp file for the GUI component we want to edit on the "Files" tab. Once selected, the five tabs in the main window functionally replace your resource editor in Visual Studio (a good thing, since it is missing from some of the free versions of Microsoft's IDEs).
These types of edits only effect the source files, so from here-on-out you can safely leave open Visual Studio. Each time you make a change:
1. Save any code edits you have been doing in Visual Studio
2. Make your graphical changes in the Projucer, Save, and
3. Switch back to Visual Studio (making sure to allow it to reload files modified outside the editor - it should prompt you after any changes)
So let's try making some changes...
Select your PluginEditor.cpp using the Introjucer's "File" tab
We have already input the needed class settings, so the only thing of interest on the class tab might be the default size of the plug-in GUI (600x400) - from here you can adjust the default or lock it down (to prevent your window being resized in the VST host).
The other tabs of the main window allow you to select the various layers or the resource editor. The most basic of which are "Graphics" and "Subcomponents" tabs. The Graphics tab lets you set your background color (or layout the background skin of your plug-in, draw basic static graphic objects etc.).
For now, let's just set the background to black (the default white is hard on the eyes).
Click the Graphics Tab→background→use the color chooser to select a color. You are also able to enter your RGB and Alpha values directly in the dialog box.
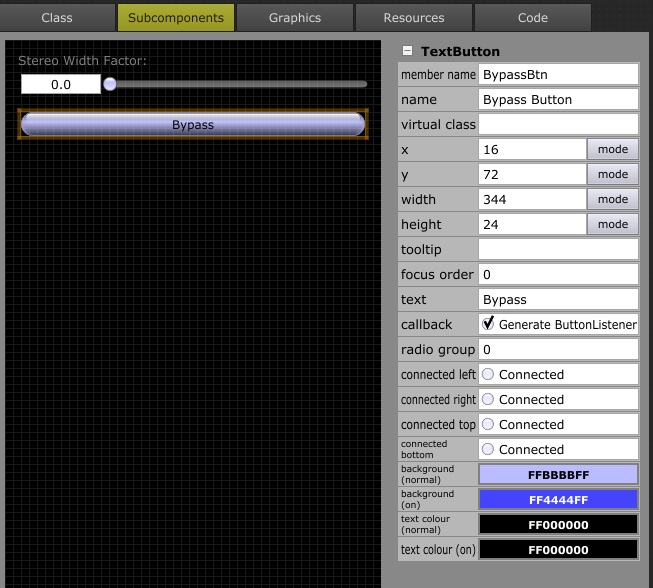
Next we will add our user controls (or subcomponents which can includ embeded child GUI components etc) - for the tutorial, we will use one slider for the width control, and one button to bypass the effect. To add components:
Click the Subcomponents Tab, then on the toolbar GUI Editor→Add New Component→Select Component
Follow that procedure to add one "Slider" and one "Text Button". We will also add a text label for our control. You will notice that each component type has its own properties which can be set as needed. The following parameters are only the changes made to each component for the tutorial. For additional help with controls or graphics, please consult JUCE documentation or other Jucer guides.
Label: |
|
Text |
Stereo Width Factor: |
Text(color) |
FF808080 |
Slider: |
|
Member Name |
WidthCtrlSld |
name |
Width Factor Slider |
Text Button: |
|
Member Name |
BypassBtn |
name |
Bypass Button |
Text |
Bypass |
When you are done, save the changes to the editor (File→Save "PluginEditor.cpp"). When you switch back to your Visual Studio window, it will indicate changes were made in an external editor - allow it to load them and continue working. In general, you can always come back to this editor, make changes and save without conflict... Though, care should be taken to save work before switching editors to avoid overwriting any changes.
3. Working with the VST Wrapper
OK, we have some our source code loaded and some UI elements to control it. The rest of the process is simply to tie it all together. In this section, we are really just telling the VST wrapper how we want it to behave in the host. It is assumed you have already done the framework changes in the "Project Setup" phase of the tutorial. The pace here will be slightly fast with some style assumptions - for some additional details or tricks see the "Additional Notes" section (which will explore additional detail on some of the changes here).
PluginProcessor.h/cpp
At this point it is worth pointing out that the PluginProcessor is merely source included by the project and it will no longer be updated by anything other than your direct changes. This is good, because it means you can add whatever you want as long as it conforms to the required structure for the wrapper (don't remove any of the default functions and you are good).
First up, let's add an instance of our effect source and some local parameters to control it.
Note: This version of the tutorial is going to use the juce::AudioProcessorValueTreeState because it is the most simple/straighforward and better yet, self-contained solution for parameters. An alternative set of classes is provided by Juce to manage custom parameters of types float, int, bool or choice. These can be great for custom GUI components as you have a bit more ease of access with the tradeoff of having to do all manual GUI work (more like we did in the Juce 3.x tutorial, but you would use the custom AudioParameter classes instead of our array of floats to track the internal values). All of these classes provide the added benifit of automatically normalizing the actual plugin parameter to the range of 0.0-1.0f which is a requirement of many hosts.
The StereoWidthCtrl plugin source is available as discussed in this tutorial (using ValueTreeState), there is also a short explanation and source for using seperate AudioParameterFloat and Bool).
Changes for PluginProcessor.h
Add an include for the source code: "#include "StereoWidthCtrl.h"
Add an inherited class for monitoring parameter changes by modifying the class declaration to be:
"class
StereoWidthCtrlAudioProcessor : public AudioProcessor,
public AudioProcessorValueTreeState::Listener
{..."
In the class declaration for StereoWidthCtrlAudioProcessor - Add a set of parameter definitions for easy recall and some accessors for your state data. Add an override to our AudioProcessorValueTreeState::Listener to call when a major change was made. And add some private instances to manage all these things (using the "private:" on line 69 as reference):
//Parameters and access
#define PARAM_SETNAME
"StereoWidthParams"
#define PARAM_BYPASS "Bypass"
#define
PARAM_WIDTH "StereoWidth";
AudioProcessorValueTreeState& getState() { return *mState; };
void
parameterChanged(const String& parameterID, float newValue)
{ MajorParamChange = true; };
private:
//Private Data, helper methods etc.
bool MajorParamChange;
ScopedPointer<AudioProcessorValueTreeState> mState;
ScopedPointer<UndoManager> mUndoManager;
//DSP
StereoWidthCtrl mWidthControl;
This gets a few things happening. The set of #defines give us easy ways to recal the string reference IDs used when talking to the JUCE library about the parameters. The first one is a name of our parameter set used to store/recall state data in our StateTree. The other two are the actual parameter names. The getState function returns the current state which might be needed for custom display updates outside our PluginProcessor. The parameterChanged override and "MajorParamChange" represent a flag mechanism to trigger deeper updates of internal states - this is used when a parameter change requires significant reconfiguration or timing that you want to coordinate with single processing blocks of the plugin (rather than real-time with the user changes). The final part is just our instance of the StereoWidthCtrl DSP class.
The next step is to update the default implementation of our member functions in PluginProcessor.cpp. These will be tackled in the order of appearance in the file (skipping a few we don't need in the tutorial) - which is how we recommend working for the first pass. After the basics, you can go back and handle updates in any order you like.
Initialize the StateTree and parameters in the Constructor. The parameters each get a normalized range of values and a default. In the example below, we are adding optional functions to customize the string value returned to the host. If you don't, the default will return the current normalized value (0-1) as a string. Once a parameter is added, it is automatically maintained by JUCE, you just have to read the values when needed by your process:
static String
GetStrValue(float v) { return String(v);};
static String
GetBypassStr(float v) { return (v != 0.0f) ? "Bypassed" : "Enabled";};
StereoWidthCtrlAudioProcessor::StereoWidthCtrlAudioProcessor()
{
//create your state manager and give your current parameter set a name
mUndoManager = new UndoManager();
mState = new
AudioProcessorValueTreeState(*this, mUndoManager);
//add each of your parameters
mState->createAndAddParameter(PARAM_BYPASS,
"Bypass", "", NormalisableRange<float>(0, 1, 1), 0, GetBypassStr,
nullptr);
mState->createAndAddParameter(PARAM_WIDTH, "Width Factor", "", NormalisableRange<float>(0.0f, 5.0f, 0.1f), mWidthControl.Getwidth(), GetStrValue, nullptr);
//Once all parameters are added, it is safe to create the actual ValueTree
mState->state = ValueTree(PARAM_SETNAME);
//add any controls you want to trigger a deeper update timed with the call to process
mState->addParameterListener(PARAM_WIDTH, this);
//start it off with deep updates regardless
MajorParamChange = true;
}
Next we need to make sure we clean up our valueTreeState and undo manager in the destructor, since we used scoped pointers we can simply set them to null:
StereoWidthCtrlAudioProcessor::~StereoWidthCtrlAudioProcessor()
{
mState = nullptr;
mUndoManager = nullptr;
}
If you were using previous versions of JUCE or you are doing manual parameter control - the StateTreeMethod above replaces ALL of the original functions for getNumParameters, getParameter, setParameter, getParameterName, text, etc. As will be seen later, it also defines the range of the parameter so that GUI elements don't need to be aligned with the parameter bounds.
OK - it is time we did some processing! This is done in the ProcessBlock call. Processing here is in-place on non-interleaved channel data. Note that in many VST hosts, the helper function for NumberOfInputChannels will always be your max channel count (or input pin count). Items from the buffer, like number of samples can be trusted.
Similarly, if your process requires the sample rate, you can call getSampleRate(); from within this block. It may also have been revealed in a call to prepareToPlay(), however that is NOT always called before processBlock.
void StereoWidthCtrlAudioProcessor::processBlock (AudioSampleBuffer& buffer, MidiBuffer& midiMessages)
{
if (MajorParamChange)
{
//this is just an example (not really major), but this is where you would put code to reconfigure buffers or other major changes.
WidthControl.SetWidth((*mState->getRawParameterValue(PARAM_WIDTH)));
MajorParamChange
= false;
}
const int totalNumInputChannels =
getTotalNumInputChannels();
const int totalNumOutputChannels =
getTotalNumOutputChannels();
if (totalNumInputChannels
!= 2 || totalNumOutputChannels != 2
||
(*mState->getRawParameterValue(PARAM_BYPASS)) != 0.0f)
{}/*Nothing to do here -
processing is in-place, so doing nothing is pass-through (for NumInputs=NumOutputs)*/
else
{//Not bypassed - do processing!
float** pChannelData =
buffer.getArrayOfWritePointers();
mWidthControl.Process(pChannelData[0], pChannelData[1],
buffer.getNumSamples());
}
}
Implement Set and Get State information - since we took time to use the handy valuetree class, exchanging state information is simple. For alternative (more manual methods) see our Juce 3.x tutorial.
void StereoWidthCtrlAudioProcessor::getStateInformation (MemoryBlock& destData)
{//Save UserParams/Data to file
MemoryOutputStream
stream(destData, false);
mState->state.writeToStream(stream);
}
void StereoWidthCtrlAudioProcessor::setStateInformation (const void* data, int sizeInBytes)
{//Load UserParams/Data from file
ValueTree tree =
ValueTree::readFromData(data, sizeInBytes);
if (tree.isValid())
{
if (tree.hasType(PARAM_SETNAME))
{
mState->state = tree;
}
}
}
PluginEditor.h/.cpp
Ok - final steps... We have all of our plug-in parameters, accessor functions, we can save/load state info, and most importantly - processing is happening. Now we want to control it. The final step is to fill in the actions of the GUI. Just one not of caution - these files is still under management of the Jucer GUI editor. If you make changes outside of designated areas, you may loose them with subsequent GUI updates. Remember to stay between comments for editable regions - or in the designated user code section.
First, we need to add some attachment helpers to the class. These helper classes tie a particular GUI element to a particular parameter in our plugin. Once the connection is made, the GUI element is fully updated by the parameter description and state, so you don't need to make manual updates. Add the following to the header file:
//[UserVariables] -- You can add your own custom variables in this section.
StereoWidthCtrlAudioProcessor& processor;
ScopedPointer<AudioProcessorValueTreeState::SliderAttachment>
mWidthAttachment;
ScopedPointer<AudioProcessorValueTreeState::ButtonAttachment>
mBypassAttachment;
//[/UserVariables]
In the constructor of the cpp file, we will do a few things. 1st, we need to tell our Bypass button that we want it to toggle its state when clicked (this makes the functionality like a check-box and would allow you to change the display styles according to its state). Similarly, we need to initialize our attachment helpers.
//[Constructor] You can add your own custom stuff here..
BypassBtn->setClickingTogglesState(true);
mWidthAttachment = new
AudioProcessorValueTreeState::SliderAttachment(processor.getState(),
PARAM_WIDTH, *WidthCtrlSld);
mBypassAttachment = new AudioProcessorValueTreeState::ButtonAttachment(processor.getState(), PARAM_BYPASS, *BypassBtn);
startTimer(200);//starts timer with interval of 200mS
//[/Constructor]
While the attachment helpers will now automatically handle the slider and button events automatically (no need to implement sliderValueChanged() or buttonClicked() callbacks), it is important these attachments are destroyed before the corresponding controls! otherwise, a crash is likely! This is done by adding destructor code prior to the destruction of the button and slider... (in the user section for "Destructor_pre", NOT "Destructor")
//[Destructor_pre]. You can add your own custom destruction code here..
mWidthAttachment = nullptr;
mBypassAttachment = nullptr;
//[Destructor_pre].
...
At this point, the attachments take care of everything else!, but as an unnecessary example of using our timerCallback(), let's add some code to reflect the enable/disable state in the button text. Note this is just an example of a display refresh operation, and there are much more efficient ways to handle this kind of text update:
void StereoWidthCtrlAudioProcessorEditor::timerCallback()
{
//if you want any
display updates with a refresh timer
//there are many more efficient
ways to do a button text...but for example:
juce::AudioProcessorParameter *bPass =
processor.getState().getParameter(PARAM_BYPASS);
BypassBtn->setButtonText(bPass->getText(bPass->getValue(),0));
}
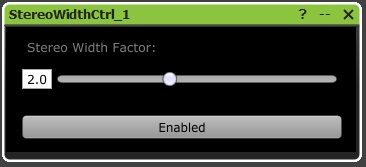
OK - That's it... A final build should be all that is between you and a functional StereoWidthControl VST pluig-in. Here is a shot of the finished GUI running in AudioMulch. You can download the source material from this tutorial [here].
Hopefully, this has given you some ideas or can serve as a reference while you start your own development projects. When starting your next project, you may also want to just check back to our quick summary page. There we will keep it short for when you just need to speed through the highlights as a general task list. Or for some additional tips and tricks, you can skip to our additional notes section. As always, if you have your own comments or questions - feel free to contact us.